Guide
A short guide to keyboard switches: are linear, tactile or clicky ones best?
by Kevin Hofer

If you’re interested in mechanical switches, you might have already come across force curves online. In this article, I explain what they’re all about.
It’s difficult to describe how it feels to press a mechanical switch. You have to try it for yourself. But in this internet era where physical shops with display items are increasingly rare, that’s easier said than done. Force curves give you an indication of how a switch feels via a diagram. But first, you have to be able to read it.
Read on for an explanation of the most important terms.
Operating/actuation force
These terms describe how hard you have to press the switch. The operating force is any force that is needed to fully depress the switch. The actuation force is how much effort is needed to activate the switch. Manufacturers don’t always provide both specifications.
The force is given in centinewtons (cN) or g-force (gf) – 1 gf is the equivalent of 0.98 cN, so they’re more or less the same.
Key travel
Key travel is the distance that a switch can or must be pressed up to a certain point. There is key travel to the switch’s actuation point and total key travel. Total key travel is the distance to fully depress the switch, which is given in millimetres.
Tactile point
This is the point at which you feel haptic feedback when pressing. There’s a tactile point with tactile and clicky switches, but not linear ones.
Reset point
The reset point is any point after actuation where the switch is ready to activate again.
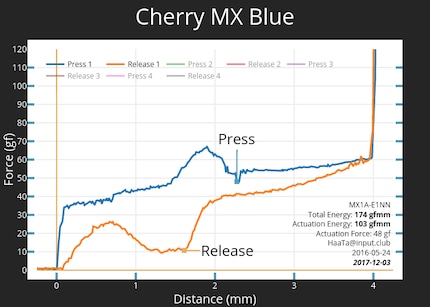
Here’s an example force curve diagram for the Cherry MX Blue switch:

A force curve diagram usually consists of two curves, one at the top and one at the bottom. They are also different colours in the diagram above. The blue line represents the switch stem – the moving part of the switch – travelling down and the orange line represents it coming back up.
You have to read the blue line for the down movement from left to right. In contrast, the up movement has to be read from right to left. You can see the key travel along the X-axis, which ranges from zero millimetres when the switch is not being pressed to four millimetres when it’s fully depressed. The end point is where the lines on the Y-axis, which represents the effort required, spike to infinity at four millimetres. It simply doesn’t go any further and you can use more and more force without anything changing.
At any given position X, position Y shows how hard you need to press the switch.
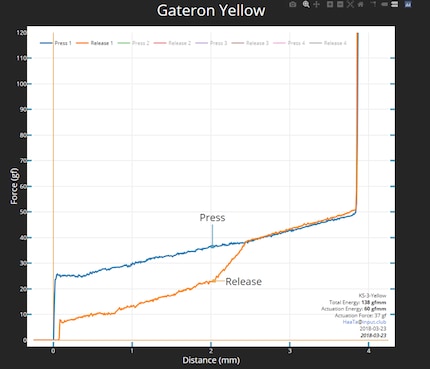
The Cherry MX Blue diagram demonstrates three other important points: Press shows when the switch is activated (actuation point). Release shows when it is deactivated (reset point). The drop just before the actuation point is the tactile bump – haptic feedback – during actuation. With linear switches, the line doesn’t have this bump because the switch doesn’t provide any haptic feedback.

Using the diagrams, you can see exactly how a key is pressed and what kind of feedback to expect at which point. Of course, this is no substitute for actually trying out switches. Unfortunately, no diagram in the world can show you how it sounds and feels.
From big data to big brother, Cyborgs to Sci-Fi. All aspects of technology and society fascinate me.
Practical solutions for everyday problems with technology, household hacks and much more.
Show all